Highly available Snowplow pipeline on kubernetes and GCP
TLDR: If you are in a hurry, feel free to skip the first chapters and directly jump to the implementation guide, starting at chapter Prerequisites
- Why running Snowplow on kubernetes?
- Snowplow architecture on kubernetes
- Prerequisites
- Preparation
- How to deploy Snowplow on kubernetes
- Summary
Knowing how our websites perform is critical for the success of virtually any business in this internet-focussed time. We design and create websites and web apps to satisfy our users, engage them and - at the end - make money. For these reasons it's from elementary importance to know, how our users are behaving on our sites, where they experience struggles and bottlenecks and where and why they churn. To answer all of these - and many more questions, there are numerous web-trackers on the market, from Google Analytics, to Adobe Analytics and to Snowplow. The latter product is unique in many ways:
- Snowplow is Open Source
- Snowplow - in contrast to Google Analytics - is - if used correctly - fully GDPR compliant and respect users privacy
- Snowplow allows for full control of the data flow - starting from the tracker to the data pipeline and data modelling. All elements run on your own infrastructure - allowing you to truly be compliant to GDPR
- Snowplow provides satisfactory tracking results for web, mobile and even amp pages
- Snowplow allows for realtime tracking, analytics and dashboarding. The latency of the pipeline is generally below 1 second
For a more in-depth introduction on what snowplow is - and why it is superior to especially Google Analytics - have a look at my previous post about "What is Snowplow"
Why running Snowplow on kubernetes?
As outlined in previous post about "What is Snowplow", Snowplow consists of multiple components:
- The trackers which collect/generate user behavior data
- The collector server, which acts as receiving server for the tracker data
- A enrich server, which checks the incoming events for validity and optionally enriches the data
- An iglu-server which - together with a database - acts as schema registry (the schemas define, how a valid event needs to look like)
- The bigquery streamloader which ultimately inserts the data into BigQuery
- A mutator server which listens for changes in incoming data types and creates new BigQuery columns on demand
- A repeater server which simply retries failed inserts
- A load balancer for serving the events to the collector servers (most probably you want to have multiple collector servers for HA reasons)
- A Google Cloud Storage (GCS) for storing deadletter events
The "glue" between all these components is Google Pub/Sub - acting as a convenient message queue between the servers. Pub/Sub also perfectly decouples the components from each other, allowing for very good horizontal scalability and high availability options.
NOTE: While this guide is using Google Pub/Sub as "glue" between all the Snowplow pipeline components, Snowplow provides a bunch of different options which don't rely on the Google Cloud. Eg. AWS Kinesis or Kafka - with the latter being a little more different. I'll discuss this in a later post.
See the following reference architecture for more details
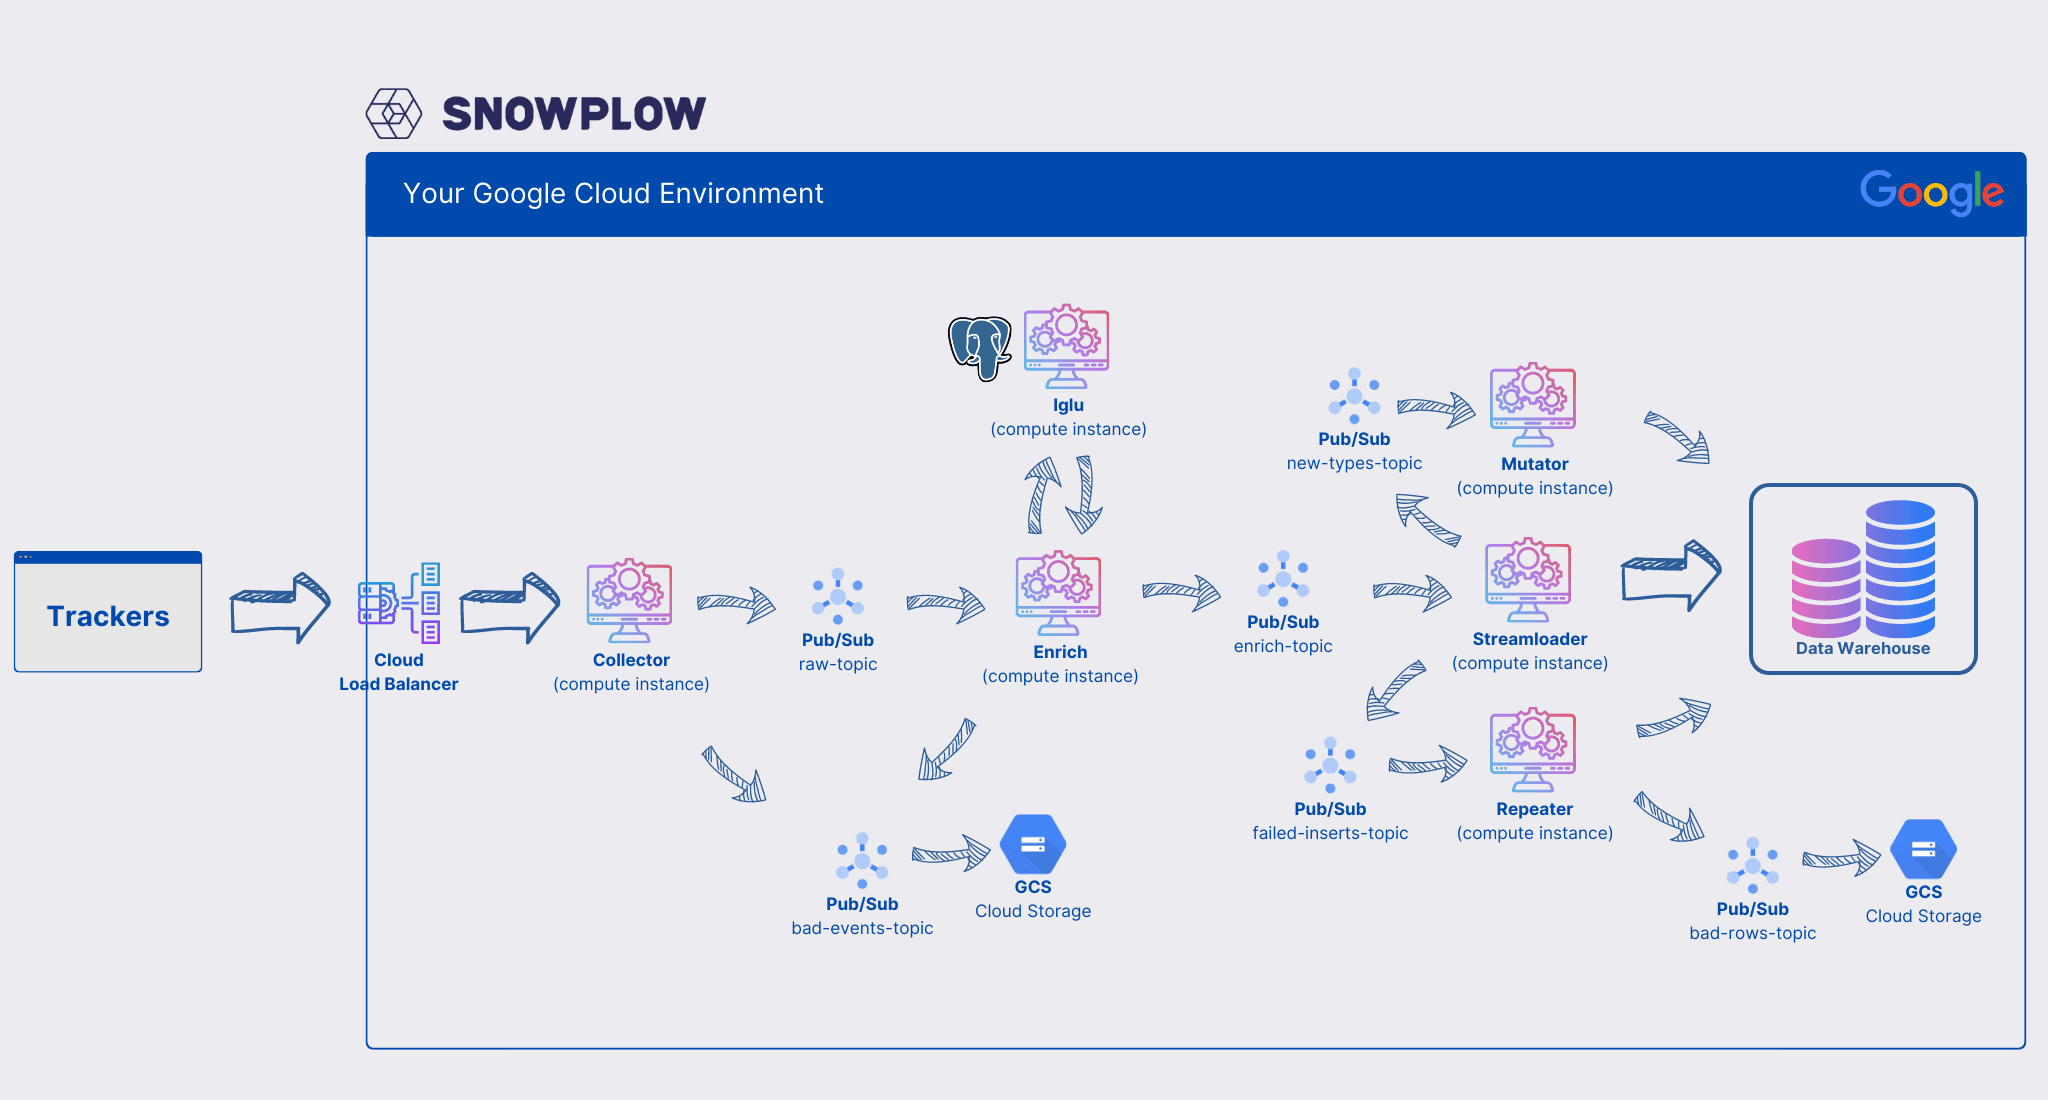 Snowplow reference architecture on GCP
As the above sketch shows, there are quite a lot of components involved. Running Pub/Sub now for multiple years I can say that this technology involves up to zero management. Set it up correctly, and it'll work. The same is true for GCS. To be fair, these things are quite "dumb" in the sense that the first one "simply" is a (great!) message queue and the latter is just a blob storage.
However, it's a different story for all the compute instances as well as the iglu postgres database. Google Cloud does a lot to keep management efforts low - however there are still a lot of server components which on times take a lot of heat (meaning events and load). Event with all the advances in serverless cloud technology, one needs to monitor and manage these components in production environments.
And for monitoring and operating production workloads there is - in my honest opinion - still no better option available than kubernetes. The managed kubernetes solutions on all major cloud providers are cheap or free, provide good availability and take away most of the hassle with running kubernetes - allowing us to focus on deploying and running applications - in this case the Snowplow pipeline.
To summarize, Snowplow consists of 6 server components + 1 database which need management and monitoring. Kubernetes is a great option to deploy these servers and add the k8s benefits to Snowplow: great tooling, monitoring, self-healing
Cost savings
Well, and my favorite reason for running Snowplow on an existing kubernetes cluster are simply costs. Snowplow only requires very limited resources. For my 100 Million events per month pipeline, actually a single e2-small compute instance per server component would be sufficient. However, then you most probably want to have two or better 3 of the collector server and the iglu server running due to high availability demands (more on that later). Also the BigQuery streamloader might need 2 or more instances as the BigQuery insert latency can be quite high - meaning that a single streamloader - even if only utilized by 50% - might not be able to cope with the incoming events, as it's constantly waiting for BigQuery to respond.
Due to the fact, that Snowplow only requires very little CPU and memory, I was able to add all the server components in my existing cluster, adding only very little "background noise" load. I'm currently running Snowplow with zero additional compute costs.
This advantage however is obviously only valid, if you have other workloads already running on a kubernetes and you can spare 5% additional CPU and memory resources.
Snowplow architecture on kubernetes
The architecture I currently use for most of my production pipelines and utilizes kubernetes to host the main Snowplow server components looks - in a little simplified version - as follows:
 Snowplow servers running on kubernetes
(Click on the image to open it with better resolution)
Looking at the sketch, we have the following components running on the Google Cloud Platform:
- Several pub/sub topics and subscriptions running on the GCP platform
- Our BigQuery data warehouse, also running on the GCP platform
- A GCS storage bucket, where our failed events are stored
The following components are running on our kubernetes cluster:
- Kubernetes ingress (Load Balancer)
- Collector server (Deployment)
- Enrich server (Deployment)
- Streamloader (Deployment)
- Mutator (Deployment)
- Repeater (Deployment)
- Iglu Server (Deployment)
- Iglu PostgreSQL cluster (CloudNativePG cluster (more on that later))
Additional to these main components we need some typical kubernetes components to make this architecture work:
- A ClusterIP service for the collector as well as the iglu server - as we need to actively send data/requests to them
- Configmaps for all the servers - for their configuration
- A BackendConfig for configuring our Ingress Load Balancer (Note: this is due to my cluster running on the Google Cloud. BackendConfigs are a Google Cloud CRD, allowing for Load Balancer backend configuration. There are similar options for most other k8s supported load balancers)
Note: My kubernetes cluster is a GKE managed kubernetes running on the GCP platform - which is most probably the most sensible option when using the Google Cloud services like BigQuery and Pub/Sub. If you are eg. on AWS, consider using the AWS kubernetes option (EKS) and use Kinesis instead of Pub/Sub and S3 instead of GCS.
In the next chapters we'll use this theoretical knowledge and implement a working Snowplow pipeline, running the servers on kubernetes and using pub/sub as the "glue" between them. The setup I'm proposing below is in general production ready. Depending on how your cluster is set up and depending on your company policies, you might add Security Contexts as well as an IDS system like Falco. This however is conventional kubernetes operations - therefore I'll focus on the Snowplow main components here.
High availability
High availability is one of the most important aspects for me when designing systems. Not even due to business criticality - but because I don't want to get calls in the mid of the night due to downed servers.
Due to the very decoupled nature and perfect horizontal scalability nature of Snowplow, it's rather easy to design it in a way, that it's highly available.
If we look at the individual components of the pipeline, we can assume that Pub/Sub, the load balancer, BigQuery and GCS are already highly available (check the google documentation for SLAs).
So we only need to look at which of the server components are potential breaking points in the pipeline.
First, let's define what breaking point means: In my case - and many web tracking use-cases - breaking point means, that we miss or lose messages. It's not so critical, that all messages are inserted in our data warehouse immediately all the time.
Looking at the architecture sketch above, we can see, that we might have two servers which are critical for message loss:
- Collector server: The obvious point of failure - if the collector server is down, we miss tracked messages. The worst case!
- Iglu server: The enrich server validates messages against a predefined schema, available at the iglu server. Therefore, if the iglu server is down, the enrich server will mark the message as invalid and forward it to the bad-rows pub/sub topic. While the message is not lost, it's still quite annoying if we need to reinsert it from the bad-rows topic.
- Iglu database: As the iglu server needs to read the schemas from somewhere, also the iglu database itself should be highly available, otherwise we are risking events getting sent to the bad-rows topic.
What's with the enrich, streamloader, mutator and repeater servers? Actually we don't need to worry about them too much. If the enrich server is down, the collector server will still get all events and forward them to Pub/Sub. There they are patiently waiting for the enrich server to come up again. The same is true for the other server components. This means, if any of the other servers is down, we simply don't get near-realtime inserts anymore, but we do not lose messages. Which is a problem which can wait until I had my morning coffee.
To make sure the before-mentioned 3 components are highly available, I suggest the following:
- Have at least 3 worker nodes in your kubernetes cluster
- Have 3 pods of your collector server as well as iglu server running. Snowplow will not mind, if there are multiple instances running - and you simply get the resiliency you need.
- For the Iglu-Database you also want to have a highly available option. Either you already have a PostgreSQL/MySQL server as part of your other business systems, or you use one of the managed cloud databases (like CloudSQL for Postgres). However, my favorite option: Use the incredible CloudNativePG postgres cluster for iglu. It's relatively lightweight and it really looks anf feels like a cloud-native postgres cluster. It provides high availability options, automated backups and is all in all a wonderful experience. See my introduction to CloudNativePG for details on what it is and how to set it up.
Note: If you need to have low-latency event inserts into your data warehouse all the time (so you can't "wait" for eg. the enrich server being restored again) follow the same multiple-instance-principles as for the collector server for your enrich server, mutator, streamloader and repeater as well.
Prerequisites
For this guide to work, we assume the following:
-
You have a working kubernetes cluster to deploy the main snowplow workload to. For this guide, preferably on the Google Cloud, but any k8s cluster will do.
-
You have a Google Cloud Project with billing enabled.
-
You have IAM permissions to create and view:
- GCS storage buckets
- BigQuery datasets
- Pub/Sub topics and subscriptions
- Service Accounts and assign IAM roles for them
-
You have a Debian derivative Linux operating system as your local development environment. A link will be provided, if the installation steps differ for other operating systems.
NOTE: Depending on the amount of events you send to your Snowplow pipeline, you might end up with some costs. This will mainly be Google Pub/Sub costs. See the Pub/Sub pricing overview for more details. That being said: I currently run a pipeline with 100 Million events per month - and my costs are at approx. 2.8€ per day. Depending on your sites workloads, there is a good chance that it's free for you to run the pub/sub instances.
Preparation
-
Make sure you have a version of Python between 3.5 and 3.9 installed (yes - unfortunately, gcloud still does not support Python 3.10+)
-
Install the gcloud cli (Ubuntu/Debian):
1# Install the system dependencies2sudo apt-get install apt-transport-https ca-certificates gnupg34# Add the gcloud CLI distribution as package source5echo "deb [signed-by=/usr/share/keyrings/cloud.google.gpg] https://packages.cloud.google.com/apt cloud-sdk main" | sudo tee -a /etc/apt/sources.list.d/google-cloud-sdk.list67# Import the Google cloud public key8curl https://packages.cloud.google.com/apt/doc/apt-key.gpg | sudo tee /usr/share/keyrings/cloud.google.gpg910# Finally, install the gcloud cli11sudo apt-get update && sudo apt-get install google-cloud-cliFor other operating systems, have a look in the official gcloud CLI installation manual.
-
Run
gcloud initand follow the steps in the console to authenticate your user against GCP. -
Enable the following Google Cloud APIs by following the links and clicking the "Enable" button. Make sure to select the correct project at the top-left of the screen.
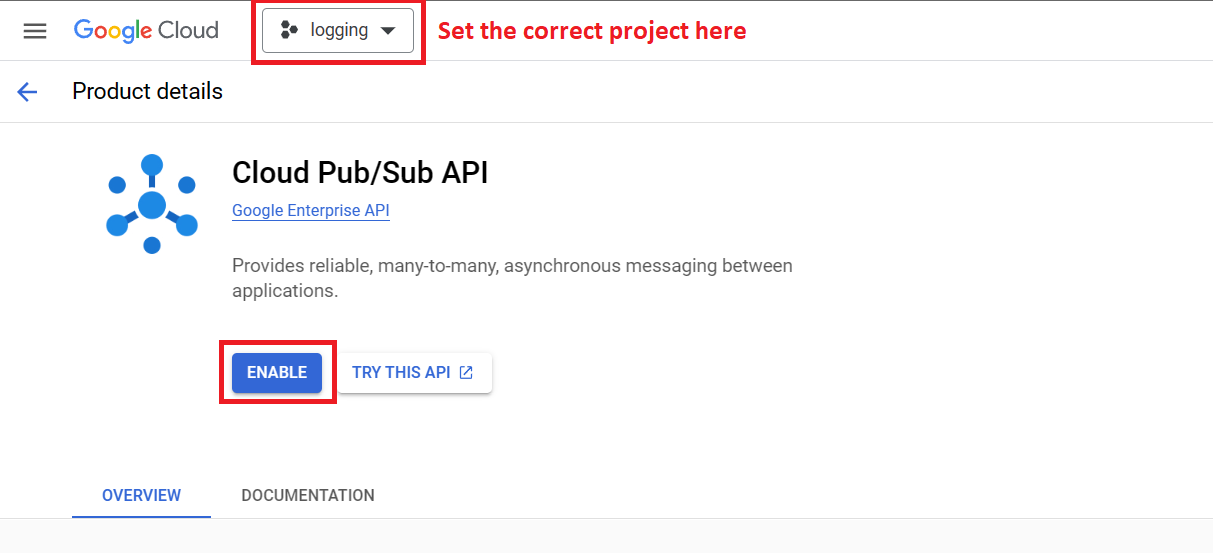 Enable the required Google Cloud APIs
If you don't get the "Enable" - button, your API is already enabled.
How to deploy Snowplow on kubernetes
The following sections describe the steps required to set up the basic Snowplow infrastructure on Google Cloud as well as deploy the individual Snowplow servers on your kubernetes cluster.
Note: In the sections below you'll encounter the term <your-project-id> quite often. Replace this term with your Google Cloud Project Id. You find it by navigating to the GCP console.
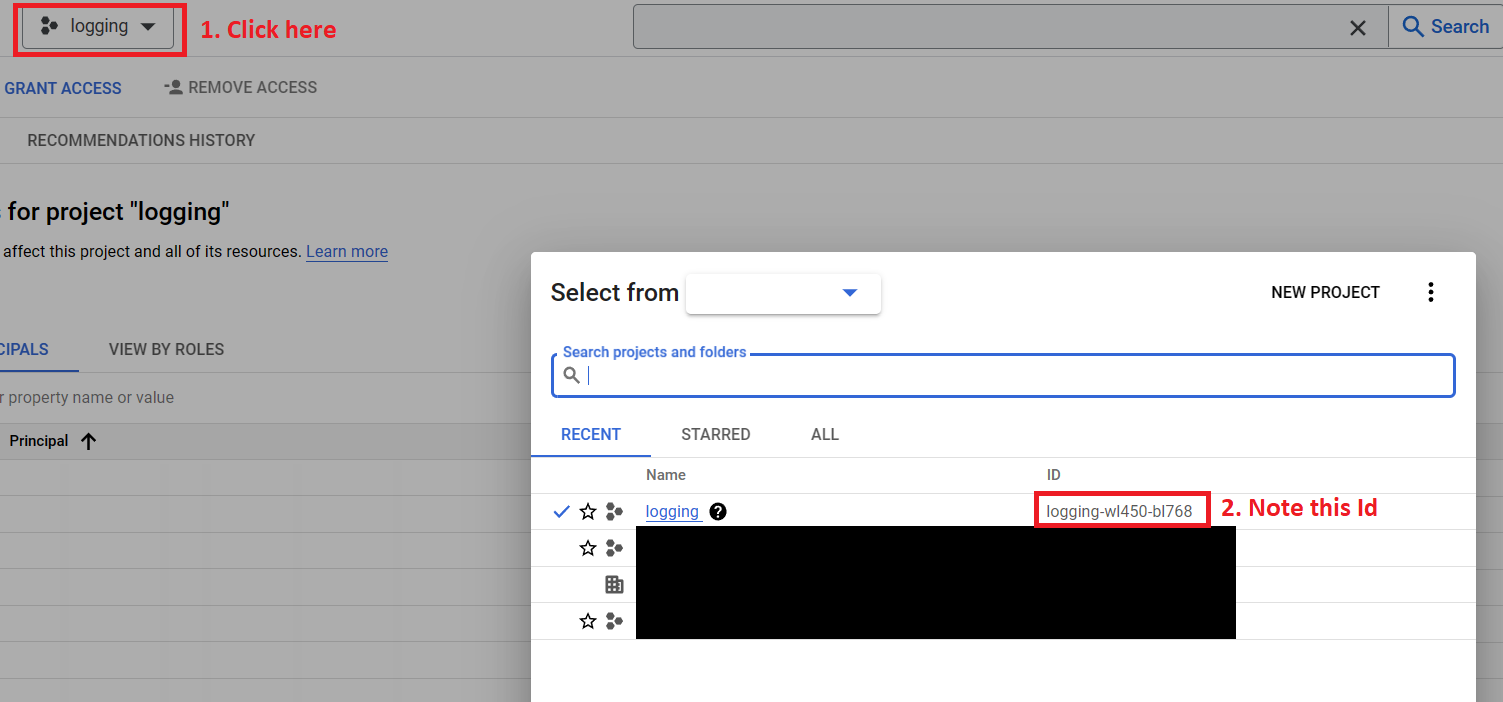 Get your GCP project id
Service Accounts
As our servers need to publish and subscribe to Pub/Sub topics, insert into BigQuery and list storage buckets, we need to create the following service accounts with the following roles:
-
spprefix-bq-loader-server: BigQuery Data Editor, Logs Writer, Pub/Sub Publisher, Pub/Sub Subscriber, Pub/Sub Viewer, Storage Object Viewer
-
spprefix-enrich-server: Logs Writer, Pub/Sub Publisher, Pub/Sub Subscriber, Pub/Sub Viewer, Storage Object Viewer
-
spprefix-collector-server: Logs Writer, Pub/Sub Publisher, Pub/Sub Viewer
NOTE: Feel free to change the names of the service-accounts to your naming schemas
Run these commands using gcloud cli to create the service accounts with their roles:
1# spprefix-bq-loader-server2gcloud iam service-accounts create spprefix-bq-loader-server \3--description="Snowplow bq loader service account" \4--display-name="spprefix-bq-loader-server"56gcloud projects add-iam-policy-binding <your-project-id> \7--member="serviceAccount:spprefix-bq-loader-server@<your-project-id>.iam.gserviceaccount.com" \8--role="roles/bigquery.dataEditor"910gcloud projects add-iam-policy-binding <your-project-id> \11--member="serviceAccount:spprefix-bq-loader-server@<your-project-id>.iam.gserviceaccount.com" \12--role="roles/logging.logWriter"1314gcloud projects add-iam-policy-binding <your-project-id> \15--member="serviceAccount:spprefix-bq-loader-server@<your-project-id>.iam.gserviceaccount.com" \16--role="roles/pubsub.publisher"1718gcloud projects add-iam-policy-binding <your-project-id> \19--member="serviceAccount:spprefix-bq-loader-server@<your-project-id>.iam.gserviceaccount.com" \20--role="roles/pubsub.subscriber"2122gcloud projects add-iam-policy-binding <your-project-id> \23--member="serviceAccount:spprefix-bq-loader-server@<your-project-id>.iam.gserviceaccount.com" \24--role="roles/pubsub.viewer"2526gcloud projects add-iam-policy-binding <your-project-id> \27--member="serviceAccount:spprefix-bq-loader-server@<your-project-id>.iam.gserviceaccount.com" \28--role="roles/storage.objectViewer"2930# spprefix-enrich-server31gcloud iam service-accounts create spprefix-enrich-server \32--description="Snowplow enrich service account" \33--display-name="spprefix-enrich-server"3435gcloud projects add-iam-policy-binding <your-project-id> \36--member="serviceAccount:spprefix-enrich-server@<your-project-id>.iam.gserviceaccount.com" \37--role="roles/logging.logWriter"3839gcloud projects add-iam-policy-binding <your-project-id> \40--member="serviceAccount:spprefix-enrich-server@<your-project-id>.iam.gserviceaccount.com" \41--role="roles/pubsub.publisher"4243gcloud projects add-iam-policy-binding <your-project-id> \44--member="serviceAccount:spprefix-enrich-server@<your-project-id>.iam.gserviceaccount.com" \45--role="roles/pubsub.subscriber"4647gcloud projects add-iam-policy-binding <your-project-id> \48--member="serviceAccount:spprefix-enrich-server@<your-project-id>.iam.gserviceaccount.com" \49--role="roles/pubsub.viewer"5051gcloud projects add-iam-policy-binding <your-project-id> \52--member="serviceAccount:spprefix-enrich-server@<your-project-id>.iam.gserviceaccount.com" \53--role="roles/storage.objectViewer"5455# spprefix-collector-server56gcloud iam service-accounts create spprefix-collector-server \57--description="Snowplow collector service account" \58--display-name="spprefix-collector-server"5960gcloud projects add-iam-policy-binding <your-project-id> \61--member="serviceAccount:spprefix-collector-server@<your-project-id>.iam.gserviceaccount.com" \62--role="roles/logging.logWriter"6364gcloud projects add-iam-policy-binding <your-project-id> \65--member="serviceAccount:spprefix-collector-server@<your-project-id>.iam.gserviceaccount.com" \66--role="roles/pubsub.publisher"6768gcloud projects add-iam-policy-binding <your-project-id> \69--member="serviceAccount:spprefix-collector-server@<your-project-id>.iam.gserviceaccount.com" \70--role="roles/pubsub.viewer"
Create and download keyfile jsons by running these commands. They will be downloaded to ~/Downloads/sa-keys.
1mkdir -p ~/Downloads/sa-keys2gcloud iam service-accounts keys create ~/Downloads/sa-keys/bq-loader-server-sa.json \3 --iam-account="spprefix-bq-loader-server@<your-project-id>.iam.gserviceaccount.com"4gcloud iam service-accounts keys create ~/Downloads/sa-keys/enrich-server-sa.json \5 --iam-account="spprefix-enrich-server@<your-project-id>.iam.gserviceaccount.com"6gcloud iam service-accounts keys create ~/Downloads/sa-keys/collector-server-sa.json \7 --iam-account="spprefix-collector-server@<your-project-id>.iam.gserviceaccount.com"
NOTE: Please delete the service account keyfiles after you you are finished setting up the cluster.
Pub/Sub
For "glueing" our server components together, we'll use Google Pub/Sub. We'll need the following topics:
- spprefix-bad-1-topic
- spprefix-bq-bad-rows-topic
- spprefix-bq-loader-server-failed-inserts-topic
- spprefix-bq-loader-server-types-topic
- spprefix-enriched-topic
- spprefix-raw-topic
Run these commands to create the topics
1gcloud pubsub topics create spprefix-bad-1-topic2gcloud pubsub topics create spprefix-bq-bad-rows-topic3gcloud pubsub topics create spprefix-bq-loader-server-failed-inserts-topic4gcloud pubsub topics create spprefix-bq-loader-server-types-topic5gcloud pubsub topics create spprefix-enriched-topic6gcloud pubsub topics create spprefix-raw-topic
Additionally, we need subscriptions on these topics.
- spprefix_bad_1: spprefix-bad-1-topic
- spprefix_bad_rows: spprefix-bq-bad-rows-topic
- spprefix-bq-loader-server-failed-inserts: spprefix-bq-loader-server-failed-inserts-topic
- spprefix-bq-loader-server-types: spprefix-bq-loader-server-types-topic
- spprefix-bq-loader-server-input: spprefix-enriched-topic
- spprefix-enrich-server: spprefix-raw-topic
Create them, by running these commands:
1gcloud pubsub subscriptions create spprefix_bad_1 --topic=spprefix-bad-1-topic --expiration-period=never2gcloud pubsub subscriptions create spprefix_bad_rows --topic=spprefix-bq-bad-rows-topic --expiration-period=never3gcloud pubsub subscriptions create spprefix-bq-loader-server-failed-inserts --topic=spprefix-bq-loader-server-failed-inserts-topic --expiration-period=never4gcloud pubsub subscriptions create spprefix-bq-loader-server-types --topic=spprefix-bq-loader-server-types-topic --expiration-period=never5gcloud pubsub subscriptions create spprefix-bq-loader-server-input --topic=spprefix-enriched-topic --expiration-period=never6gcloud pubsub subscriptions create spprefix-enrich-server --topic=spprefix-raw-topic --expiration-period=never
Google Cloud Storage
Why do we need Google Cloud Storage? Well, we don't desperately need to provision cloud storage for Snowplow to work - however Snowplow provides a great deadlettering-feature. Meaning - if for whatever reasons - Snowplow can't insert an incoming event it will add the data as file to blob storage like Google Cloud Storage. This allows for debugging, why the event was not inserted - and even better - for letter re-inserting the data, when you were able to resolve the cause for non-insertion.
Run the following command to create a storage bucket for snowplow deadletters (events which can't be inserted)
1gcloud storage buckets create gs://spprefix-bq-loader-dead-letter
Note: The google bucket names need to be globally unique - therefore please change the name of your storage bucket to a different one. Eg. replace the term
spprefixto something different.
To allow our BigQuery loader service to insert bad events into the newly created dead-letter-bucket, we want to add the storage object admin permission to this bucket:
1gcloud storage buckets add-iam-policy-binding gs://spprefix-bq-loader-dead-letter --member="serviceAccount:spprefix-bq-loader-server@<your-project-id>.iam.gserviceaccount.com" --role=roles/storage.objectAdmin
Note: That are finally all the bootstrapping steps. Let's continue with setting up our server components on kubernetes.
IP-Address
For allowing our trackers send data to our collector we need a public IP-Address which we can bind our cluster ingress to. If you run your workloads on a GKE cluster, follow this step. Otherwise, make sure that the ingress we deploy can be reached via a public IP or URL.
1# Create a Google Cloud global static IP-Address2gcloud compute addresses create snowplow-ingress-ip --global --ip-version IPV4
NOTE: If running on GKE, the ingress IP-Address needs to be of type
global!
Set up Iglu server
First, let's set up our iglu server.
Prepare Iglu Server database
The iglu server requires a database to store it's schemas. This guide assumes, you provide this database. If not, my recommendations are, either use:
- CloudSQL for Postgres, a managed Postgres server from Google, or - even better -
- CloudNativePG, a highly available postgres cluster. Follow the link and set up the cluster as in the description.
Please note your postgres database, user and password for the iglu server for the next steps.
Setup the iglu deployment
-
Create a file called
iglu-configmap.yaml, with following content. Change the following literals:<iglu-database>: Postgres database name<iglu-database-user>: Postgres user for this iglu database<your-postgres-password>: Postgres password of your iglu postgres user<your-iglu-api-key>: Create and add a randomly generated API key for accessing iglu here. Keep this secret. You will need this for later steps. This can be any string.
1kind: ConfigMap2apiVersion: v13metadata:4 name: iglu-configmap5 namespace: snowplow6data:7 iglu-server.hocon: |8 {9 "repoServer": {10 "interface": "0.0.0.0"11 "port": 808012 "threadPool": "cached"13 "maxConnections": 204814 }15 "database": {16 "type": "postgres"17 "host": "pgcluster-iglu-rw"18 "port": 543219 "dbname": "<iglu-database>"20 "username": "<iglu-database-user>"21 "password": "<your-postgres-password>"22 "driver": "org.postgresql.Driver"23 pool: {24 "type": "hikari"25 "maximumPoolSize": 526 connectionPool: {27 "type": "fixed"28 "size": 429 }30 "transactionPool": "cached"31 }32 }33 "debug": false34 "patchesAllowed": true35 "superApiKey": "<your-iglu-api-key>"36 } -
Create a file
iglu-deployment.yamlwith following content.1apiVersion: apps/v12kind: Deployment3metadata:4 name: iglu-server5 namespace: snowplow6spec:7 selector:8 matchLabels:9 app: iglu10 replicas: 211 template:12 metadata:13 labels:14 app: iglu15 spec:16 securityContext:17 runAsUser: 100018 runAsGroup: 300019 fsGroup: 200020 containers:21 - name: iglu-server22 image: snowplow/iglu-server:0.9.023 command: ["/home/snowplow/bin/iglu-server", "--config", "/snowplow/config/iglu-server.hocon"]24 imagePullPolicy: "IfNotPresent"25 env:26 - name: JAVA_OPTS27 value: -Dorg.slf4j.simpleLogger.defaultLogLevel=info28 volumeMounts:29 - name: iglu-config-volume30 mountPath: /snowplow/config31 resources:32 requests:33 memory: "256Mi"34 cpu: "100m"35 limits:36 memory: "1.5Gi"37 volumes:38 - name: iglu-config-volume39 configMap:40 name: iglu-configmap41 items:42 - key: iglu-server.hocon43 path: iglu-server.hocon -
As our servers need to reach the iglu server, we want to add a ClusterIP service. Add a file
iglu-service.yamlwith following content:1apiVersion: v12kind: Service3metadata:4 name: iglu-server-service5 namespace: snowplow6spec:7 selector:8 app: iglu9 ports:10 - name: http11 protocol: TCP12 port: 8013 targetPort: 8080NOTE: For unknown reasons, the iglu service (iglu/iglu-service.yaml) needs to listen on port 80 or 443 - otherwise the enrich server can't access iglu.
Apply all manifests with kubectl apply -f <filename>.
Your iglu server is now ready to consume and serve your event schemas.
Set up BigQuery StreamLoader
-
Create a file
streamloader-configmap.yamland add the following content. Change<your-google-project-id>to your google project id and<your-iglu-api-key>to the key of your iglu API - set in the step above.1kind: ConfigMap2apiVersion: v13metadata:4 name: streamloader-configmap5 namespace: snowplow6data:7 config.hocon: |8 {9 "projectId": <your-google-project-id>1011 "loader": {12 "input": {13 "subscription": spprefix-bq-loader-server-input14 }15 "output": {16 "good": {17 "datasetId": spprefix_pipeline_db18 "tableId": events19 }20 "bad": {21 "topic": spprefix-bq-bad-rows-topic22 }23 "types": {24 "topic": spprefix-bq-loader-server-types-topic25 }26 "failedInserts": {27 "topic": spprefix-bq-loader-server-failed-inserts-topic28 }29 }30 }3132 "mutator": {33 "input": {34 "subscription": spprefix-bq-loader-server-types35 }36 "output": {37 "good": ${loader.output.good}38 }39 }4041 "repeater": {42 "input": {43 "subscription": spprefix-bq-loader-server-failed-inserts44 }45 "output": {46 "good": ${loader.output.good}47 "deadLetters": {48 "bucket": "gs://spprefix-bq-loader-dead-letter"49 }50 }51 }52 }535455 iglu-config.json: |56 {57 "schema": "iglu:com.snowplowanalytics.iglu/resolver-config/jsonschema/1-0-3",58 "data": {59 "cacheSize": 500,60 "cacheTtl": 600,61 "repositories":62 [63 {64 "connection": {65 "http": {66 "uri": "http://iglucentral.com"67 }68 },69 "name": "Iglu Central",70 "priority": 10,71 "vendorPrefixes": []72 },73 {74 "connection": {75 "http": {76 "uri": "http://mirror01.iglucentral.com"77 }78 },79 "name": "Iglu Central - Mirror 01",80 "priority": 20,81 "vendorPrefixes": []82 },83 {84 "connection": {85 "http": {86 "apikey": "<your-iglu-api-key>",87 "uri": "http://iglu-server-service/api"88 }89 },90 "name": "Iglu Server",91 "priority": 0,92 "vendorPrefixes": []93 }94 ]95 }96 }9798 -
Run the following command to create a base64 encoded string of your streamloader service account:
1base64 ~/Downloads/sa-keys/bq-loader-server-sa.json -
Create a file
bqloader_google_application_credentials.yamlwith following content - and add the output of the base64 step instead of<base64-string-of-bqloader-service-account-key-file>1apiVersion: v12kind: Secret3metadata:4 name: bqloader-serviceaccount-creds5 namespace: snowplow6type: Opaque7data:8 sa_json: |9 <base64-string-of-bqloader-service-account-key-file> -
Create a file
streamloader-deployment.yaml1apiVersion: apps/v12kind: Deployment3metadata:4 name: streamloader-server5 namespace: snowplow6spec:7 selector:8 matchLabels:9 app: streamloader10 replicas: 111 template:12 metadata:13 labels:14 app: streamloader15 spec:16 containers:17 - name: streamloader-server18 image: snowplow/snowplow-bigquery-streamloader:1.6.419 command:20 - "/home/snowplow/bin/snowplow-bigquery-streamloader"21 - "--config"22 - "/snowplow/config/config.hocon"23 - "--resolver"24 - "/snowplow/config/iglu-config.json"25 imagePullPolicy: "IfNotPresent"26 env:27 - name: JAVA_OPTS28 value: -Dorg.slf4j.simpleLogger.defaultLogLevel=info29 - name: GOOGLE_APPLICATION_CREDENTIALS30 value: /etc/gcp/sa_credentials.json31 volumeMounts:32 - name: streamloader-config-volume33 mountPath: /snowplow/config34 - name: service-account-credentials-volume35 mountPath: /etc/gcp36 readOnly: true37 resources:38 requests:39 memory: "256Mi"40 cpu: "250m"41 limits:42 memory: "2Gi"43 volumes:44 - name: streamloader-config-volume45 configMap:46 name: streamloader-configmap47 items:48 - key: iglu-config.json49 path: iglu-config.json50 - key: config.hocon51 path: config.hocon52 - name: service-account-credentials-volume53 secret:54 secretName: bqloader-serviceaccount-creds55 items:56 - key: sa_json57 path: sa_credentials.json -
Apply the three manifests using
kubectl apply.
Set up the Mutator
-
The mutator server conveniently uses exact the same configuration as the streamloader - therefore we will reuse it's configuration. So we only need to create a file
mutator-deployment.yamlhere.1apiVersion: apps/v12kind: Deployment3metadata:4 name: mutator-server5 namespace: snowplow6spec:7 selector:8 matchLabels:9 app: mutator10 replicas: 111 template:12 metadata:13 labels:14 app: mutator15 spec:16 containers:17 - name: mutator-server18 image: snowplow/snowplow-bigquery-mutator:1.6.419 command:20 - "/home/snowplow/bin/snowplow-bigquery-mutator"21 - "listen"22 - "--config"23 - "/snowplow/config/config.hocon"24 - "--resolver"25 - "/snowplow/config/iglu-config.json"26 imagePullPolicy: "IfNotPresent"27 env:28 - name: JAVA_OPTS29 value: -Dorg.slf4j.simpleLogger.defaultLogLevel=info30 - name: GOOGLE_APPLICATION_CREDENTIALS31 value: /etc/gcp/sa_credentials.json32 volumeMounts:33 - name: mutator-config-volume34 mountPath: /snowplow/config35 - name: service-account-credentials-volume36 mountPath: /etc/gcp37 readOnly: true38 resources:39 requests:40 memory: "128Mi"41 cpu: "150m"42 limits:43 memory: "512Mi"44 volumes:45 - name: mutator-config-volume46 configMap:47 name: streamloader-configmap48 items:49 - key: iglu-config.json50 path: iglu-config.json51 - key: config.hocon52 path: config.hocon53 - name: service-account-credentials-volume54 secret:55 secretName: bqloader-serviceaccount-creds56 items:57 - key: sa_json58 path: sa_credentials.json -
Apply this manifest using
kubectl apply
Initialize the BigQuery database
The mutator server provides a convenient little script which sets up the BigQuery database. For this to happen, run the following steps:
-
Create the BigQuery dataset by running:
1bq --location=EU mk -d --description "Snowplow event dataset" spprefix_pipeline_db(Change the location to your preferred BigQuery location)
-
Create a file
mutator-init-deployment.yamlwith this content:1apiVersion: v12kind: Pod3metadata:4 name: mutator-init-server5 namespace: snowplow6spec:7 containers:8 - name: mutator-init-server9 image: snowplow/snowplow-bigquery-mutator:1.6.410 command:11 - "/home/snowplow/bin/snowplow-bigquery-mutator"12 - "create"13 - "--config"14 - "/snowplow/config/config.hocon"15 - "--resolver"16 - "/snowplow/config/iglu-config.json"17 - "--partitionColumn=collector_tstamp"18 - "--requirePartitionFilter"19 imagePullPolicy: "IfNotPresent"20 env:21 - name: JAVA_OPTS22 value: -Dorg.slf4j.simpleLogger.defaultLogLevel=info23 - name: GOOGLE_APPLICATION_CREDENTIALS24 value: /etc/gcp/sa_credentials.json25 volumeMounts:26 - name: mutator-config-volume27 mountPath: /snowplow/config28 - name: service-account-credentials-volume29 mountPath: /etc/gcp30 readOnly: true31 resources:32 requests:33 memory: "128Mi"34 cpu: "150m"35 limits:36 memory: "512Mi"37 volumes:38 - name: mutator-config-volume39 configMap:40 name: streamloader-configmap41 items:42 - key: iglu-config.json43 path: iglu-config.json44 - key: config.hocon45 path: config.hocon46 - name: service-account-credentials-volume47 secret:48 secretName: bqloader-serviceaccount-creds49 items:50 - key: sa_json51 path: sa_credentials.json -
Apply this manifest. This will create a pod which will initialize the BigQuery dataset structure to meet the Snowplow canonical/atomic event structure.
Set up the Repeater
The repeater server conveniently uses exact the same configuration as the streamloader - therefore we will reuse it's configuration again. So we only need to create a file repeater-deployment.yaml - and apply it, using kubectl apply
1apiVersion: apps/v12kind: Deployment3metadata:4 name: repeater-server5 namespace: snowplow6spec:7 selector:8 matchLabels:9 app: repeater10 replicas: 111 template:12 metadata:13 labels:14 app: repeater15 spec:16 containers:17 - name: repeater-server18 image: snowplow/snowplow-bigquery-repeater:1.6.419 command:20 - "/home/snowplow/bin/snowplow-bigquery-repeater"21 - "--config"22 - "/snowplow/config/config.hocon"23 - "--resolver"24 - "/snowplow/config/iglu-config.json"25 - "--bufferSize=20"26 - "--timeout=20"27 - "--backoffPeriod=900"2829 imagePullPolicy: "IfNotPresent"30 env:31 - name: JAVA_OPTS32 value: -Dorg.slf4j.simpleLogger.defaultLogLevel=info33 - name: GOOGLE_APPLICATION_CREDENTIALS34 value: /etc/gcp/sa_credentials.json35 volumeMounts:36 - name: repeater-config-volume37 mountPath: /snowplow/config38 - name: service-account-credentials-volume39 mountPath: /etc/gcp40 readOnly: true41 resources:42 requests:43 memory: "128Mi"44 cpu: "150m"45 limits:46 memory: "512Mi"47 volumes:48 - name: repeater-config-volume49 configMap:50 name: streamloader-configmap51 items:52 - key: iglu-config.json53 path: iglu-config.json54 - key: config.hocon55 path: config.hocon56 - name: service-account-credentials-volume57 secret:58 secretName: bqloader-serviceaccount-creds59 items:60 - key: sa_json61 path: sa_credentials.json
Set up the Enrich server
For the enrich server, we need to configure the connection to the iglu server as well as each individual enrichment we want to enable. We can do all of that in a configmap.
-
un the following command to create a base64 encoded string of your streamloader service account:
1base64 ~/Downloads/sa-keys/enrich-server-sa.json -
Create a file
enrich_google_application_credentials.yamlwith following content - and add the output of the base64 step instead of<base64-string-of-enrich-service-account-key-file>1apiVersion: v12kind: Secret3metadata:4 name: enrich-serviceaccount-creds5 namespace: snowplow6type: Opaque7data:8 sa_json: |9 <base64-string-of-enrich-service-account-key-file> -
Create a file
enrich-configmap.yamlwith the following content, but change<your-iglu-api-key>to the key of your iglu API. Also change<my-salt>to a randomly generated salt-key used for creating the pseudonymization of user IP-Addresses. This configmap enables the following enrichments (See Snowplows enrichment docs for more details):- Campaign attribution
- PII Pseudonymization of the users IP Address
- Event fingerprint
- Referer parser
- Useragent parser
- YAUAA useragent analyses
1kind: ConfigMap2apiVersion: v13metadata:4 name: enrich-configmap5 namespace: snowplow6data:7 enrichment_campaigns.json: |8 {9 "schema": "iglu:com.snowplowanalytics.snowplow/campaign_attribution/jsonschema/1-0-1",10 "data": {11 "name": "campaign_attribution",12 "vendor": "com.snowplowanalytics.snowplow",13 "enabled": true,14 "parameters": {15 "mapping": "static",16 "fields": {17 "mktMedium": ["utm_medium", "medium"],18 "mktSource": ["utm_source", "source"],19 "mktTerm": ["utm_term", "legacy_term"],20 "mktContent": ["utm_content"],21 "mktCampaign": ["utm_campaign", "cid", "legacy_campaign"]22 }23 }24 }25 }2627 enrichment_pii.json: |28 {29 "schema": "iglu:com.snowplowanalytics.snowplow.enrichments/pii_enrichment_config/jsonschema/2-0-0",30 "data": {31 "vendor": "com.snowplowanalytics.snowplow.enrichments",32 "name": "pii_enrichment_config",33 "emitEvent": true,34 "enabled": true,35 "parameters": {36 "pii": [37 {38 "pojo": {39 "field": "user_ipaddress"40 }41 }42 ],43 "strategy": {44 "pseudonymize": {45 "hashFunction": "MD5",46 "salt": "<my-salt>"47 }48 }49 }50 }51 }5253 enrichment_event_fingerprint.json: |54 {55 "schema": "iglu:com.snowplowanalytics.snowplow/event_fingerprint_config/jsonschema/1-0-1",56 "data": {57 "name": "event_fingerprint_config",58 "vendor": "com.snowplowanalytics.snowplow",59 "enabled": true,60 "parameters": {61 "excludeParameters": ["cv", "eid", "nuid", "stm"],62 "hashAlgorithm": "MD5"63 }64 }65 }6667 enrichment_referrer_parser.json: |68 {69 "schema": "iglu:com.snowplowanalytics.snowplow/referer_parser/jsonschema/2-0-0",70 "data": {71 "name": "referer_parser",72 "vendor": "com.snowplowanalytics.snowplow",73 "enabled": true,74 "parameters": {75 "database": "referers-latest.json",76 "uri": "https://snowplow-hosted-assets.s3.eu-west-1.amazonaws.com/third-party/referer-parser/",77 "internalDomains": []78 }79 }80 }8182 enrichment_ua_parser.json: |83 {84 "schema": "iglu:com.snowplowanalytics.snowplow/ua_parser_config/jsonschema/1-0-1",85 "data": {86 "name": "ua_parser_config",87 "vendor": "com.snowplowanalytics.snowplow",88 "enabled": true,89 "parameters": {90 "uri": "https://snowplow-hosted-assets.s3.eu-west-1.amazonaws.com/third-party/ua-parser",91 "database": "regexes-latest.yaml"92 }93 }94 }9596 enrichment_yauaa.json: |97 {98 "schema": "iglu:com.snowplowanalytics.snowplow.enrichments/yauaa_enrichment_config/jsonschema/1-0-0",99 "data": {100 "enabled": true,101 "vendor": "com.snowplowanalytics.snowplow.enrichments",102 "name": "yauaa_enrichment_config"103 }104 }105106 config.hocon: |107 {108 "auth": {109 "type": "Gcp"110 }111 "input": {112 "type": "PubSub"113 "subscription": "projects/<your-project-id>/subscriptions/spprefix-enrich-server"114 }115 "output":116 {117 "good": {118 "type": "PubSub"119 "topic": "projects/<your-project-id>/topics/spprefix-enriched-topic"120 "attributes": [ "app_id", "event_name" ]121 }122 "bad": {123 "type": "PubSub"124 "topic": "projects/<your-project-id>/topics/spprefix-bad-1-topic"125 }126 }127 "assetsUpdatePeriod": "10080 minutes"128 }129130 iglu-config.json: |131 {132 "schema": "iglu:com.snowplowanalytics.iglu/resolver-config/jsonschema/1-0-3",133 "data": {134 "cacheSize": 500,135 "cacheTtl": 600,136 "repositories":137 [138 {139 "connection": {140 "http": {141 "uri": "http://iglucentral.com"142 }143 },144 "name": "Iglu Central",145 "priority": 10,146 "vendorPrefixes": []147 },148 {149 "connection": {150 "http": {151 "uri": "http://mirror01.iglucentral.com"152 }153 },154 "name": "Iglu Central - Mirror 01",155 "priority": 20,156 "vendorPrefixes": []157 },158 {159 "connection": {160 "http": {161 "apikey": "<your-iglu-api-key>",162 "uri": "http://iglu-server-service/api"163 }164 },165 "name": "Iglu Server",166 "priority": 0,167 "vendorPrefixes": []168 }169 ]170 }171 } -
Create the file
enrich-deployment.yamland add the following content:1apiVersion: apps/v12kind: Deployment3metadata:4 name: enrich-server5 namespace: snowplow6spec:7 selector:8 matchLabels:9 app: enrich10 replicas: 111 template:12 metadata:13 labels:14 app: enrich15 spec:16 containers:17 - name: enrich-server18 image: snowplow/snowplow-enrich-pubsub:3.7.019 command:20 - "/home/snowplow/bin/snowplow-enrich-pubsub"21 - "--config"22 - "/snowplow/config/config.hocon"23 - "--iglu-config"24 - "/snowplow/config/iglu-config.json"25 - "--enrichments"26 - "/snowplow/config/enrichments"27 imagePullPolicy: "IfNotPresent"28 env:29 - name: JAVA_OPTS30 value: -Dorg.slf4j.simpleLogger.defaultLogLevel=info -Dorg.slf4j.simpleLogger.log.InvalidEnriched=debug31 - name: GOOGLE_APPLICATION_CREDENTIALS32 value: /etc/gcp/sa_credentials.json33 volumeMounts:34 - name: enrich-config-volume35 mountPath: /snowplow/config36 - name: service-account-credentials-volume37 mountPath: /etc/gcp38 readOnly: true39 resources:40 requests:41 memory: "256Mi"42 cpu: "350m"43 limits:44 memory: "1.5Gi"45 cpu: 246 volumes:47 - name: enrich-config-volume48 configMap:49 name: enrich-configmap50 items:51 - key: iglu-config.json52 path: iglu-config.json53 - key: config.hocon54 path: config.hocon55 - key: enrichment_campaigns.json56 path: enrichments/enrichment_campaigns.json57 - key: enrichment_pii.json58 path: enrichments/enrichment_pii.json59 - key: enrichment_event_fingerprint.json60 path: enrichments/enrichment_event_fingerprint.json61 - key: enrichment_referrer_parser.json62 path: enrichments/enrichment_referrer_parser.json63 - key: enrichment_ua_parser.json64 path: enrichments/enrichment_ua_parser.json65 - name: service-account-credentials-volume66 secret:67 secretName: enrich-serviceaccount-creds68 items:69 - key: sa_json70 path: sa_credentials.json -
Apply both manifests with
kubectl apply
Set up the Collector server and ingress load balancer
For the final component we are going to set up the following resources:
- Service account secret
- collector configmap
- collector deployment
- backend config for configuring the load balancer backend
- collector service
- ingress to allow our trackers to send data
-
Run the following command to create a base64 encoded string of your streamloader service account:
1base64 ~/Downloads/sa-keys/collector-server-sa.json -
Create a file
bqloader_google_application_credentials.yamlwith following content - and add the output of the base64 step instead of<base64-string-of-bqloader-service-account-key-file>1apiVersion: v12kind: Secret3metadata:4 name: collector-serviceaccount-creds5 namespace: snowplow6type: Opaque7data:8 sa_json: |9 <base64-string-of-collector-service-account-key-file> -
Create a file
collector-configmap.yamlwith the following content, replace<your-project-id>with your google project id and apply it usingkubectl applyNOTE: The configuration file contains the following config option:
"/customdtsp/tp2" = "/com.snowplowanalytics.snowplow/tp2". This configures a custom collector path. By default, all trackers send their events tohttps://<collector-url>/com.snowplowanalytics.snowplow/tp2. However, this is often blocked by AdBlockers. Therefore, it is advised to change the path to a custom one. In the below configuration, we use/customdtsp/tp2as our tracking path. Make sure to also add this setting to your tracker configuration.Very important: The custom-path needs to have exactly two levels.
/customdtsp/tp2works,/customdtspdoes not as well as/customdtsp/tp2/otherdoes notVery important: While this setting allows us to prevent AdBlockers to interfere with our tracking - please make sure to respect the users privacy. Do not and do never tracker data which can identify specific users.
1kind: ConfigMap2apiVersion: v13metadata:4 name: collector-configmap5 namespace: snowplow6data:7 config.hocon: |8 collector {9 interface = "0.0.0.0"10 port = 808011 ssl {12 enable = false13 redirect = false14 port = 844315 }16 paths {17 "/customdtsp/tp2" = "/com.snowplowanalytics.snowplow/tp2"18 }19 p3p {20 policyRef = "/w3c/p3p.xml"21 CP = "NOI DSP COR NID PSA OUR IND COM NAV STA"22 }23 crossDomain {24 enabled = false25 domains = [ "*" ]26 secure = true27 }28 cookie {29 enabled = true30 expiration = "365 days"31 name = sp32 domains = []33 fallbackDomain = ""34 secure = true35 httpOnly = false36 sameSite = "None"37 }38 doNotTrackCookie {39 enabled = false40 name = ""41 value = ""42 }43 cookieBounce {44 enabled = false45 name = "n3pc"46 fallbackNetworkUserId = "00000000-0000-4000-A000-000000000000"47 forwardedProtocolHeader = "X-Forwarded-Proto"48 }49 enableDefaultRedirect = false50 redirectMacro {51 enabled = false52 placeholder = "[TOKEN]"53 }54 rootResponse {55 enabled = false56 statusCode = 30257 headers = {}58 body = "302, redirecting"59 }60 cors {61 accessControlMaxAge = "5 seconds"62 }63 prometheusMetrics {64 enabled = false65 }66 streams {67 good = spprefix-raw-topic68 bad = spprefix-bad-1-topic69 useIpAddressAsPartitionKey = false70 sink {71 enabled = google-pub-sub72 googleProjectId = "<your-project-id>"73 backoffPolicy {74 minBackoff = 100075 maxBackoff = 100076 totalBackoff = 1000077 multiplier = 178 }79 }80 buffer {81 byteLimit = 100000082 recordLimit = 50083 timeLimit = 50084 }85 }86 telemetry {87 disable = false88 url = "telemetry-g.snowplowanalytics.com"89 userProvidedId = ""90 moduleName = "collector-pubsub-ce"91 moduleVersion = "0.2.2"92 autoGeneratedId = "329042380932sdjfiosdfo"93 }94 }95 akka {96 loglevel = WARNING97 loggers = ["akka.event.slf4j.Slf4jLogger"]98 http.server {99 remote-address-header = on100 raw-request-uri-header = on101 parsing {102 max-uri-length = 32768103 uri-parsing-mode = relaxed104 }105 max-connections = 2048106 }107 } -
Create a file
collector-deployment.yamland apply it1apiVersion: apps/v12kind: Deployment3metadata:4 name: collector-server5 namespace: snowplow6spec:7 selector:8 matchLabels:9 app: collector10 replicas: 211 template:12 metadata:13 labels:14 app: collector15 spec:16 # Prevent the scheduler to place two pods on the same node17 affinity:18 podAntiAffinity:19 preferredDuringSchedulingIgnoredDuringExecution:20 - weight: 1021 podAffinityTerm:22 labelSelector:23 matchExpressions:24 - key: app25 operator: In26 values:27 - collector28 topologyKey: "kubernetes.io/hostname"29 containers:30 - name: collector-server31 image: snowplow/scala-stream-collector-pubsub:2.8.232 command:33 - "/opt/snowplow/bin/snowplow-stream-collector"34 - "--config"35 - "/snowplow/config/config.hocon"36 imagePullPolicy: "IfNotPresent"37 env:38 - name: JAVA_OPTS39 value: -Dorg.slf4j.simpleLogger.defaultLogLevel=info40 - name: GOOGLE_APPLICATION_CREDENTIALS41 value: /etc/gcp/sa_credentials.json42 volumeMounts:43 - name: collector-config-volume44 mountPath: /snowplow/config45 - name: service-account-credentials-volume46 mountPath: /etc/gcp47 readOnly: true48 resources:49 requests:50 memory: "128Mi"51 cpu: "250m"52 limits:53 memory: "1Gi"54 volumes:55 - name: collector-config-volume56 configMap:57 name: collector-configmap58 items:59 - key: config.hocon60 path: config.hocon61 - name: service-account-credentials-volume62 secret:63 secretName: collector-serviceaccount-creds64 items:65 - key: sa_json66 path: sa_credentials.json -
Create a file
collector-be-config.yamland apply it:Note: This step is only relevant, if you run your workloads on a GKE cluster. If you have a different kubernetes distribution, configure the load-balancer we are going to deploy in the next steps to use an
httphealthcheck on Port 8080 and request-path/healthon the collector-server-pods.1apiVersion: cloud.google.com/v12kind: BackendConfig3metadata:4 name: collector-backendconfig5 namespace: snowplow6spec:7 timeoutSec: 608 healthCheck:9 checkIntervalSec: 1010 timeoutSec: 1011 healthyThreshold: 312 unhealthyThreshold: 513 type: HTTP14 requestPath: /health15 port: 808016 logging:17 enable: false -
Create a file
collector-service.yamland apply it:1apiVersion: v12kind: Service3metadata:4 name: collector-server-service5 namespace: snowplow6 annotations:7 cloud.google.com/backend-config: '{"default": "collector-backendconfig"}' # this is only required, if you run on GKE. See note in the step above.8spec:9 selector:10 app: collector11 type: ClusterIP12 ports:13 - protocol: TCP14 port: 808015 targetPort: 8080 -
Create a file
collector-ingress.yamland apply it:Note: This next manifest assumes, that you have cert-manager installed and a Cluster-Issuer for issuing letsencrypt certificates configured. If not, please foll this HowToGeek-guide
The file also assumes you are running your workloads on a GKE cluster and want to deploy a GCE load balancer for our ingress. However, you might use any ingress/loadbalancer you want. Just make sure that the load-balancer directs the traffic to the
collector-server-serviceon Port 8080.1apiVersion: networking.k8s.io/v12kind: Ingress3metadata:4 name: snowplow-ingress5 namespace: snowplow6 annotations:7 kubernetes.io/ingress.global-static-ip-name: snowplow-ingress-ip8 cert-manager.io/cluster-issuer: letsencrypt-prod9 kubernetes.io/ingress.class: gce10 acme.cert-manager.io/http01-edit-in-place: "true"11spec:12 tls: # < placing a host in the TLS config will indicate a certificate should be created13 - hosts:14 - spcollector.example.com15 secretName: snowplow-collector-cert-secret # < cert-manager will store the created certificate in this secret16 rules:17 - host: spcollector.example.com18 http:19 paths:20 - path: /21 pathType: Prefix22 backend:23 service:24 name: collector-server-service25 port:26 number: 8080
Summary
In this rather extensive post we covered how a Snowplow-Deployment on kubernetes might look like. We visited all the required steps for setting up the Google Cloud resources as well as how to deploy our main server workloads on a kubernetes cluster.
While this involves a lot of steps, in the end it's worth it:
- It's easier to maintain all the server components on kubernetes then it is with other cloud offerings.
- It's most probably more cost efficient.
Furthermore, this whole setup is operational very stable:
- The Google Cloud services (Pub/Sub, Storage, BigQuery, LoadBalancer) are very stable on their own.
- Running our server workloads on kubernetes also makes them very resilient. Especially, as Snowplow is excellent in horizontal scalability. If you need more resiliency (or throughput), simply add another replica.
- Both of these points make Snowplow rather a "setup and forget" type of solution with very little operational efforts.
NOTE: As these are arguably quite a lot of steps to take I created a convenient bootstrap script which sets up basically all these components by running it. If you want access to this script, please contact me with the contact form at the bottom of the page.
------------------
Interested in how to train your very own Large Language Model?
We prepared a well-researched guide for how to use the latest advancements in Open Source technology to fine-tune your own LLM. This has many advantages like:
- Cost control
- Data privacy
- Excellent performance - adjusted specifically for your intended use